Showing posts with label Stenciling. Show all posts

Monday, April 7, 2014

One Last Stencil Design


For this design I added red Pearl Ex to the embossing paste and then put red pan pastel at the bottom of the card for more color.  I decided I didn't care for the two colors right together so I simply took a small eraser and got rid of some of the pastel.  Even with all the pigment in the pastels they erase quite nicely.  And they don't need a fixative so there's no need to deal with those fumes and that spray.  Nice!

Sunday, April 6, 2014

Stencil With Embossing Powder


This card shows another design from the Hero Arts stencil.  I put black embossing powder on the wet paste knowing it would bubble and be more dimensional but it didn't add as much dimension as I thought it would.  But it was good.  Good to have different ways of using our products and tools.

Saturday, April 5, 2014

Stencil With Label

 There was enough of the embossing paste left from yesterday's card for another design so I went for it.  Unfortunately it didn't quite cover all of it and some of the white cardstock showed through so I used that "flopportunity" as a challenge and added the label.  I decided I liked it.  This time I added yellow pan pastel to one side.  Sometimes a mistake can be a good thing.

Friday, April 4, 2014

Stenciled Border


I recently received a Hero Arts stencil that contained five different borders.  Could hardly wait to give it a try.  For this design I used translucent embossing paste with some green Pearl Ex which provided not only color but some iridescence that doesn't show well in the photo.  After it dried I added white pan pastel to one side.  The pastels are rich in pigment and the sponges that go with them make coverage quick and easy.  Gotta love those stencils!

Friday, March 7, 2014

Stencil With Label


I showed this stencil design previously but since I had enough embossing paste left for another card, I used it.  Unfortunately there wasn't quite enough for one end of the stencil and the white cardstock showed through so I used that "flopportunity" to add the label which I decided worked pretty well.  Again I added color with pan pastels, easily applied with the round sponges that are available where the pastels are sold.

Thursday, March 6, 2014

Ribbon Stencil


The ribbon on this card is another stencil design included on the Hero Arts sheet.  I added pan pastel color to the bottom and then didn't like it right next to the stenciling so simply erased some of it away.  That works very well with pan pastels.  It's a bit amazing that the pigment in the pastels is so strong and yet it erases so cleanly and easily.  Nice!

Wednesday, March 5, 2014

Arrow Stencil

The arrow heads on this card are stenciled with embossing paste.  I added black embossing powder on top of the paste and immediately heated it.  I knew it would bubble and dimension would be added but the effect wasn't as strong as I imagined.  I still liked it.  The flower is die cut (black) and punched (white) and the leaves are also punched.  The tiny dots are dimensional paint.  Gotta admit - stencils are fun and an easy way to add some unique design to projects.

Tuesday, March 4, 2014

Stenciled!


I recently received a Hero Arts stencil that had five different border designs included.  I got out my embossing paste and mixed in some green Pearl Ex for this design.  After the paste was dry I added some white pan pastels to one side.  They are rich in pigment and a little goes a long way.  They cover a large area in a hurry if one of the round sponges is used.  Stencils are great!

Stencil Fun

I was given a Hero Arts stencil and didn't wait long to try it out.  It was nice because it had several designs on one stencil, all the perfect size for cardmaking.   I decided to initiate the stencil with embossing paste and used a translucent paste with some Pearl Ex added.  This card shows one of the design but it doesn't show the iridescent properties of the Pearl Ex.  I added white pan pastel to the left of the stenciling and the rest is obviously punches and die cuts.  Stay tuned for more stencil designs.

Monday, March 3, 2014

Layers and Lace

Most of this design was from a stencil.  I added lace and a text tag with a die cut butterfly for more color.  The green panel was folder embossed.

Friday, February 28, 2014

Stenciled Panel

The green panel has several layers of stenciling.  I matted it onto a white panel with a border punch edge and embellished with die cut flowers, leaves and butterfly.  Dots of dimensional paint add the final touch.

Thursday, February 27, 2014

Doily Time


I used a paper doily as a mask for this stenciling.  I added a punched border and butterflies and a die cut flower.  Satin ribbon completes the design except for the pearl dots which are dimensional paint

Wednesday, February 26, 2014

Green Dotted Circle

 And there's more stenciled backgrounds . . . this stencil I made by using a die cut.  The card back is flat and the text is inside the yellow mat which opens.  I cut the upper corner to match the tag and adhered yellow to the back  Design was complete with a punched flower and dots of dimensional paint.  Rather simple.

Tuesday, February 25, 2014

Celebrate

This is the second card I made for club.  This time I didn't actually eliminate the "e's" but covered them with little punched flowers.  I wasn't totally happy with it but couldn't figure out how to improve it either.

The background was one of my stenciled printed but I washed it with some gel stick color to eliminate some of the brightness.

"Celebrate" is actually stamped in black but the photo caught the glittery pen that I added to it. I added extra flowers and some die cut leaves.

I used a border punch on both mats, offsetting them a bit for a more lacey look.

It was an interesting challenge to replace letters with images.

Monday, February 24, 2014

Wish

You gotta love grunge to appreciate this card! and it started with the theme for stamp club this month which was to replace a stamped letter with an image.   I chose one of my printed deli papers but I added more designs (the hexagons and ink splatters) that were stenciled with ink.  I also added some ink to the top edge and let it run down the card and I added the black splatters by running my thumb across a toothbrush.

"Wish" was stamped and cut out and I hand cut the candle to replace the "I."  For a little glitz I added some sequins; the flame and letters have some glittery pen accents.

I tore the bottom edge of the card and adhered a contrasting color of cardstock to the card inside.  I thought it contrasted with the grungy design better than the original white cardstock.


Sunday, February 23, 2014

Primative Look

A manila tag was completely covered with the stenciling using red and yellow paint.  Three different stencils were used--triangles, stripes and a chevron design.

To enhance the stenciling I traced the triangles with a black pen.  After the stamped mask image was put in place I added some silver pearls.  I stamped the mask, added some red colored pencil and a bit of glitter pen, cut it out and matted it with black. The tag is adhered directly to the card but the mask is popped up.

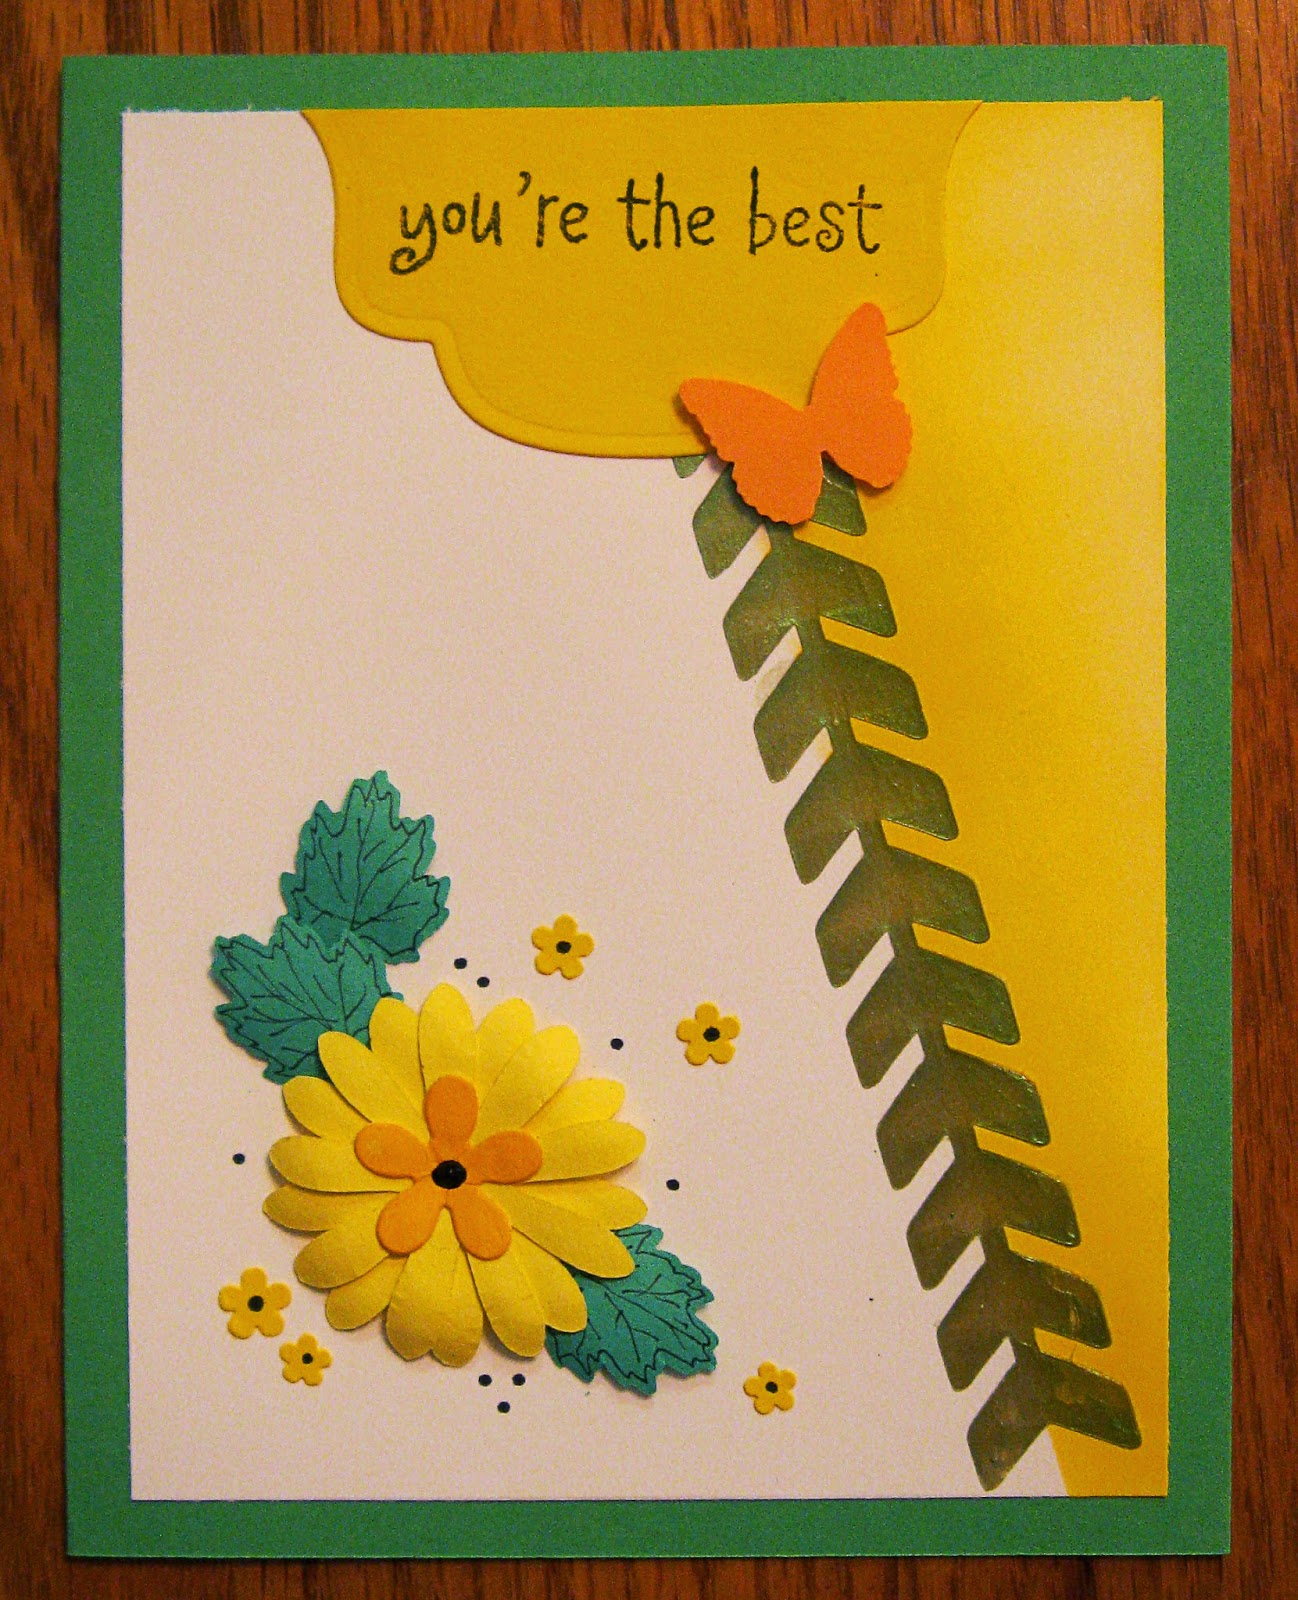
I stamped a leaf randomly on the card front and stenciled the chevron pattern using Versamark ink.

If I had seen that tag available commercially, I would have had no interest in it but since I was determined to use what I made, it became a challenge to put something together that worked.  It's good to give the brain and artistic muse a good challenge now and then.

Saturday, February 22, 2014

Tagged Again

All that was stenciled or printed directly on this tag was the blue hexagon design.  It wasn't totally successful in that the embossing paste found its way under the stencil but that's part of the learning process and it was still useable.  I used white embossing paste, added blue embossing powder while it was wet and heated it after the paste was dry.  Research indicated that the embossing powder bubbles if it is heated while the paste is wet.   The other background color is the deli paper that I ripped up and adhered with matte medium.  I matted the tag with contrasting cardstock. and it is popped up with foam tape.

There was a circular design as part of the print which seemed ideal for some text that I hand wrote.  The flowers and leaves were die cut and I added some sparkly stickers, an arrow clip and a small ribbon bow.

I adhered printed deli wrap to the front of the card, cut the leading edge and added a punched border.

It was nice that I decided to try the stenciling and the gelli plate at the  time I also thought it would be good to again make some cards with tags.  It's a nice marriage.

Friday, February 21, 2014

Tag Card

It was fun to play with the printing but I actually put some of my printed materials to work!  All I did to the tag was ink the edges with black.  I added some die cut flowers that I folder embossed and I inked the ends of the petals.  The leaf is also die cut and inked.  I added some ribbon and music washi tape and it was ready to become the focal point.

For the background I stamped the leafy swirl onto deli paper and adhered it directly to the card front.  I cut the leading edge and lined it with a string of red after I added three strips of washi tape.

One of the qualities of this type of printing is that you'll never duplicate exactly anything you've previously done.  But variety is the spice of life.  The fun is in the surprising results.

Thursday, February 20, 2014

Backgrounds, Tags

At the end of the first stenciling session I had this material to use in future projects. Not shown are pages in an art journal.  The translucent paper is deli wrap which is used to take more paint from the gelli plate after doing a print.  It can be applied to projects to build backgrounds or color using matte medium--and it's nice to get a second or third print from the plate.  The tags can be added to cards or journal pages.  Nice bounty from a couple hours of fun.

Wednesday, February 19, 2014

Gelli and Stencils, Oh My

There are a multitude of online recipes for making gelli plates and you can also buy them commercially prepared.  I opted to make a "permanent" plate by mixing 7 packets of unflavored gelatin into 1 cup alcohol mixed with 1/2 cup glycerine.  I added 1.5 cups boiling water, mixed it well and poured it into an 8" square pan and let it solidify.  It was easily removed from the pan for use.

And there's more than a multitude of stencils available in all kinds of designs and various ways to create your own.  Those shown are thin plastic and I've added painter's tape around to edges to increase the area to hold them in place when they are being used.  They are still easily washable.

By putting the basic supplies to use with the stencils and gelli plate you can create all sorts of backgrounds and entertain yourself for many hours.  Work near a sink if possible and have the baby wipes close at hand.