Friday, March 30, 2012

Window Tag

I got the basic card design for this card from Judy who got it from Molly who . . . .  (aren't stampers great folks?!)

I adhered beautiful patterned paper to the bottom of the card.  I cut the yellow tag, rounded the corners and added ribbon with a knot.  I punched out a flower "window" and stamped the text.  I white embossed a flower that would show through the window and then adhered the tag using foam tape so it is three-dimensional.

This is a great design for all kinds of occasions.

Thursday, March 29, 2012

Salem Creek

We were in Salem and on our way to a small cafe as a celebration of our daughter's birthday.  This little creek adds a lot of design to the area and I loved how it contrasted with the bright, colorful foliage in the trees and bushes.  It was also an excellent lunch!

Wednesday, March 28, 2012

Positive & Negative Butterflies

This was the third card I made using the positive and negative theme.  I stamped the background texture in orange.  The butterfly border was punched using a Tonic punch and I randomly adhered the punch outs as if they were flying away.  Some were adhered directly to the card and others were attached using foam tape for dimension.  I didn't have baker's twine in the color I wanted so I twisted some white and orange embroidery floss for the same effect.

Tuesday, March 27, 2012

Artist Trading Card - Zebra

I used a couple of my zebra photos from Africa to create this digital collage.  The mask was from a photo of carvings that were for sale in one of the villages.  I chose a monochromatic color scheme to keep it pulled together.

Monday, March 26, 2012

Positive & Negative In Pink

To create this positive/negative design I punched the flowers out of the pink strip of cardstock and saved the punchouts.  I put patterned paper behind the flower "windows" then inked the punched out flowers and adhered them to the pink strip with foam tape to add dimension.  Two borders were punched from white cardstock and adhered to the long edges of the pink strip.  I powder embossed the top of the card front and then adhered the pink strip on top of that.  Multi-step card but not difficult.

Friday, March 23, 2012

Positive & Negative Vase

The challenge for last month's stamp club card exchange was to use a punch or die cut and incorporate both the positive and negative pieces.  I challenged myself to use both on the same card though that wasn't required.

For this design I punched the vase and then used a dot embossing folder for the white background.  I added some patterned paper behind the "window" the punch created and matted the white with some red in one corner and orange in the remaining three corners.

I inked the punched out vase and adhered it to the card using foam tape for dimension.  I handcut the leaves and punched the flowers, adding black for the flower centers.

Thursday, March 22, 2012

Image Share - Toddler

This is another photo I purchased in Leadville and shows the other end of the generation span.  Feel free to use it in any legal manner you choose.  She's very cute, isn't she?!  Makes you wonder who she is/was and what became of her.  Make up your own story.

Wednesday, March 21, 2012

Doily Card Nine

This doily makes quite a statement but it is not easily mailed.  I cut out the stamped image, scored and folded it at the center of each "petal."  I adhered it to a card front embossed with an embossing folder that created a frame.  The center is an embroidered flower, gathered ribbon and small pink ribbon roses.

And that's the last of my doily cards!

Tuesday, March 20, 2012

Image Share - Gramma

This is an old photo that I purchased when we visited Leadville CO last fall.  Feel free to use it any any legal way you choose.

Monday, March 19, 2012

Doily Card Eight

There's just one more doily card which I'll show later this week.  For this card I stamped the Stampin Up image in color on white and added a dark brown mat.  I gathered some ribbo and topped it with a kraft circle, a die cut doily and flowers connected with a large brad.  All of that was mounted onto a brown card.

Friday, March 16, 2012

Doily Card Seven

Here's another in my series of doily cards.  I challenged myself to use the stamp in various ways and for this one I stamped the image in color and then cut it into three sections.  I added a crocheted flower to the center and layered punched flowers on top of that.  The butterflies are a die cut and I added faux jewels for the flower center and butterfly bodies.  The banner is pink paper that loops back on itself.  The text is hand-written.  Don't do that very often.

Thursday, March 15, 2012

Africa Trading Card

After we prepared our slide show and I printed out photos for an album, I had time to play with some of my photos to create digital collages.  I never know how these are going to turn out.  I start with a background and layer on images, playing with layer effects.  I usually end with Photoshop brushes around the edges.  This one includes three photos - the background, the elephant and the flower.

Wednesday, March 14, 2012

Doily No. 6

For this card the doily was stamped in color on white cardstock and then overstamped in black with an Inkadinkado flower image.  The butterfly was punched and fiber was added for his body and antennae.  I mounted the white onto light brown and then adhered that to an embossed white background and finally to a white card.  Narrow satin ribbon was added in the form of a border and a bow.

Tuesday, March 13, 2012

Turquoise Door

I'm taking you back to Leadville CO where I took photos of lots of old doors.  This one was particularly tall and one has to wonder why.  I don't recall which building it was in but it is colorful.  The stripes to the sides frame it nicely, too.

Monday, March 12, 2012

Doily No. 5

The doily was stamped in color on white cardstock.  The flowers were created with Carl Craft and Punch Bunch punches.  The flourish is a die cut and the green border is an EK Success punch.  I added pink patterned paper and matted the image on dark green, then adhered it to a pink card.

Friday, March 9, 2012

Doily No. 4

I stamped the doily image on black cardstock and embossed it in gold.  That was cut out, cut in half and adhered to gray cardstock.  Patterned paper was placed below it and black ribbon covered the seam.  I created a sequin "flower" and adhered that with a loop of narrow ribbon.  All of that was matted with black cardstock and then adhered to the front of a gray card.  This one has quite an elegant look I think.

Thursday, March 8, 2012

Flowers

I still make a few artist trading cards, some stamped and some digital.  This one started with a background from a box of tissue.  I stamped and die cut the flowers in three sizes and adhered them with some twine behind.  The centers are clear dimensional glaze.  I stamped text on a piece of coordinating cardstock and attached it with brads.  Clean and simple.

Wednesday, March 7, 2012

Doily No. 3

Continuing with my challenge to use one stamp in a variety of ways, I embossed the doily in blue on patterned paper.  The design was complete with punched flowers placed in the center.  I added ribbon and adhered the image to a square, white card.  

Tuesday, March 6, 2012

Smash Book

My daughter, granddaughter and I each started a Smash book when I visited OR last month.  It turned out to be a great "girls" project to do together even though we each work in our own book.

My husband and I went to the Crave Bake Shop in downtown Lake Oswego where we sampled one of their cinnamon rolls (see photo).  It was delicious and I never would have guessed that it was vegan.  I also purchased a chocolate cupcake to take home and it was equally delicious.

We've decided that this is on our list for "must visit" when we return to Lake Oswego.  One of the significant things about Crave Bake Shop?  It was a winner on the Foodnetwork Cup Cake Wars.  The $10,000 prize allowed them to open this storefront.  I highly recommend it for a special treat - or two.

Monday, March 5, 2012

Doily No. 2

For this greeting card I white embossed the doily image on lavender cardstock.  I added white ribbon, then purple ribbon which I tied in a bow.  Faux jewels were added to the ribbon.  I folded a rosette using patterned paper and added faux jewels to the center.  I adhered the lavender cardstock to a white card and added a dark strip at the bottom.  It makes quite a statement I think.

Friday, March 2, 2012

One Stamp Many Ways #1

Okay, I admit that I was a little slow in buying this Stampin' Up doily stamp.   But once I had it in my hand I was determined to use it a number of different ways.  I went back to the class I taught on this subject several years ao for reminders.

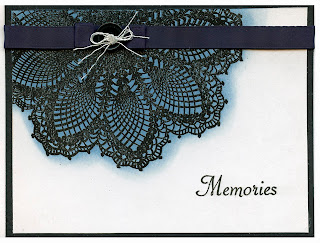
This card shows the image embossed in black on white cardstock and then I inked over it using Distress Inks and the sponge applicator.  I simply added a bit of text, a border of ribbon and a fiber bow.

Sometimes I wish this stamp was a bit smaller, but it certainly makes a statement as it is!

Thursday, March 1, 2012

Artist Trading Card Challenge No 1


The same artist created the card on the left as created the card on Tuesday.  Again I used my photos to replicate it.  I used a section of leopard skin in the background and used similar animals to hers.  The text was the biggest challenge but I managed to come fairly close I think.

That's the end of the trading crd challenge.